C-3PO Prop Construction
As a natural progression, after building R2-D2, I have decided to build a replica of C-3PO. This will be life size and completely built from scratch, so I’ll essentially be carving him out of wood, and then vacuum forming over all the pieces to make a prop or possibly a wearable suit… depending on how it turns out.
Newest updates will be at the bottom of the article as usual.
This project was last updated on 3rd June ’08
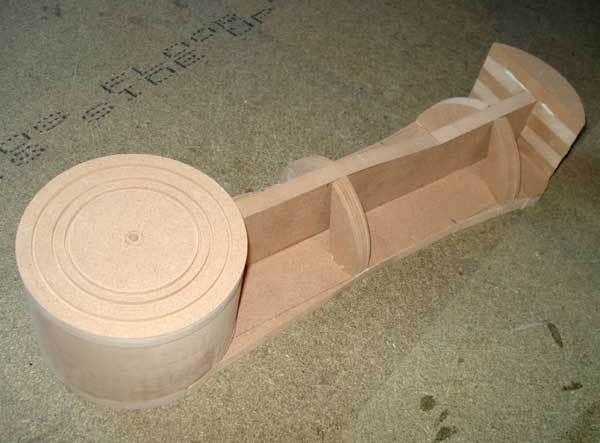
I’ve started with the thigh parts as they are fairly sizeable and have quite a few details to them. They will also set the scale for the rest of the prop as they need to fit over the ‘pelvis’ part which will come shortly afterwards.
I’ve stacked up bits of wood to make two tapered pieces roughly the right size for the thighs. This will eventually make the moulds for the fronts and backs of both the legs’ upper parts:
There’s a lot of sanding to do once the glue is properly dry. The curved line is roughly where they will be trimed down to, but there are a lot of other countours to be shaped into the thigh parts too. If anyone wants any sawdust I will have plenty spare:

13th Feb ’08
I got this full size human mannequin from eBay to fit the bits of C-3PO around as I go. I’ll be making hollow shells for most of the pieces – so it should turn out as a wearable suit as well as a static prop:

15th Feb ’08
I got my chisel out and started chipping away at the wood:


Up to this point everything was done with hand tools. I then used a belt sander and also some car body filler to remove any pits:

The basic thigh parts are pretty smooth. I’ll be adding the detail with thin strips of birch plywood stuck on top, this will also mark the contours for the top of the legs where they join the pelvis:

16th Feb ’08
This part is the mould for the base of the thigh where it joins the knee. This will be a separate piece so it can slide over/around the actual knee cylinder as the leg bends:

For the shin I am trying a different approach to the mould making because cutting out every piece from solid blocks is quite heavy goiing. I’m going to try making a frame for this piece, then bend thin birch plywood over it to make the main contours. The gaps will be filled with polyurethane expanding foam gap filler and car body filler:

Here’s the expanding foam, it should set pretty rigid – at least enough to put car body filler of the top of:

18th Feb ’08
I’ve added some more internal support to my shin frame. I’m waiting for the thin birch plywood to arrive but hopefully it will be flexible enough to bend over the MDF pieces:
I thought I’d have a go at making the foot moulds. I drew around my shoes to get the basic shape, and then stacked up layers of MDF to make the approximate contours:

After a lot of sanding and filling they have taken shape, although they look more like my shoes than C-3PO’s feet. There are a few details to add, but I think they will be ok since the lower shins, where they join the foot/ankle, will be shaped around the feet a bit like flared trousers:

20th Feb ’08
I’ve used Maplex board, which is cheap, flexible and quite tough, to make the bands on the feet. They are glued and tacked on with panel pins:

They look a bit like something a victorian cobbler would make, but I think they will look great once I vacuum form over them in glossy gold plastic:

I’ve also used Maplex board to make the main contours over the shin frame:

There’s a bit more to do after the lower curved block section is shaped up. but it’s looking not too bad so far. This is the same mould that will make both sides of both shins and knees:

21st Feb ’08
I decided that since the foot moulds are ready, I would vacuum form over them. I’ve used white and black plastic to see which takes the gold paint best:


They both look quite good sprayed up gold, but I’ll probably use black so the inside of the prop is black instead of white, which will be a little more forgiving where there are gaps and joints:


23rd Feb ’08
I’ve added the detail to the thigh moulds:

…and vacuum formed over them. There are two pulls taken from each mould to make the front and backs of the thighs:

Here are the parts assembled:


I’ve also finished the knee mould that makes the top detail part of the knee:

Here’s the pull taken from the knee mould twice and stuck to each thigh. These will fit nicely on top of the shin and knee piece.

The paint’s not quite dry but here they are all sprayed gold:


24th Feb ’08
The shin mould is also finished. This single mould makes both sides of both shins and knees. I’ve taken four pulls from it and assembled them back to back:

All the pieces are getting some more paint (the shins are upside down):

I’m pretty happy with the pieces so far, this is all the leg pieces done now:

29th Feb ’08
Here are all the leg pieces now the paint is dry:


5th Mar ’08
The pelvis part has been made from an MDF frame with Maplex board bent over it to make the main contours:

The front mould is on the right:

Lots of foam gap filler and car body filler has also been used. There’s a bit of sanding to do before the detail can be added:

8th Mar ’08
After lots of filling and sanding:

Front:

Back:

10th Mar ’08
Just a brief update for today – all the pieces together so far:

I decided to make a PVC pipe frame for C-3PO instead of using the mannequin (I have another plan for that):

so now the legs are free-standing on a wooden plinth that holds the other ends of the pipe in two tapered holes:

12th Mar ’08
I’ve started the upper body, which will be constructed the same as the pelvis mould:


C-3PO’s back has a square box on it, I still have that part to make:

It looks about the right shape anyway:

14th Mar ’08
Getting there, still a lot of filling and sanding to do:


18th Mar ’08
Both front and back moulds are complete. Although there is a little detail missing from the back, I will probably make an extra panel for the lower half of the back pack at some other stage:


And here are plastic the parts in gold:


Next I will be extending the frame and sorting out the bridge part between the pelvis and upper body.
19th Mar ’08
Brief update for today. I have extended the frame upwards, so here are the parts all together so far:

30th Mar ’08
The basic parts for the arm moulds. I will only make one set of moulds for both arms, but there are four main pieces for the fronts and backs. The other piece is the shoulder bell:

I’ve used thin birch plywood over the MDF frames, and polystyrene packing to fill the shoulder bell. The shoulder bell will be filled with car body filler once the glue is dry:

The finished arm moulds ready for vacuum forming:

This is the shoulder bell – it’s mostly done, just a little more filling an sanding once the glue is dry:

4th April ’08
The shoulders and arms are now complete (minus some detail parts which I’ll come back to later):


I have aslo made some hand and finger moulds which will be the next parts to be made. The fingers pieces will get chopped up into shorter sections to they bend in the right places, hence they are currently too long:


21st April ’08
I managed to buy some moulds on eBay for the head. They are ‘negative’ moulds because they are meant for fibreglassing inside to make the finished object.
The person was selling them because they are a bit worn out and have a few dents in now, but this is fine for me because I’ve made positive plaster casts from them to use for vacuum forming. Any dents appear as lumps in the plaster which I can sand off.
I’ve done the back and front plaster casts, now I just have to wait a while for the plaster to thoroughly dry:


22nd May ’08
Well, the plaster dried out and I tried vacuum forming it. The plastic pulled in nice and tight but I couldn’t get it off. Eventualy it broke and so did some parts of the plaster mould. I guess there were too many small features for this method of moulding:

Next I tried to do a crude roto-mould with the original rubber moulds that I’d bought (which I cast the plaster from). This method involves putting a small amount of casting resin inside the mould and rotating it all around until it sets. The idea being that it coats the outside and makes a hollow piece. You are supposed to do this with a machine to make it even, and the results make it obvious why:

The face isn’t too bad, but some parts are very thin, the back is much worse however:

So, time for attempt number 3 – watch this space.
24th May ’08
Here are all the plastic sections that make C-3PO’s hands…

…I’ve sprayed them all gold…

…and stuck them to a pair of rubber gloves stuffed with foam rubber:

Here’s C-3PO with his hands attached, I’ve also added some of the ‘messy wires’ to his middle section – just like in the movies:

This is the current state of the project – just the head to sort out really, as well as a few other minor details.

28th May ’08
Well, it’s just about third time lucky for C-3PO’s head. This time I used the original moulds again, but instead of using fibreglassing stuff, which is what the moulds were intended for, I used flexible wood filler and papier mache, with PVA/wood glue instead of wall paper paste.
The results aren’t perfect, and it’s been drying for a week. Some of the wood filler in the thicker parts hasn’t dried through properly, so some of it stuck to the mould – around the eyes etc. Once this has dried some more now it’s out of the mould I’ll just fill and sand it from the outside, then paint it with primer/filler paint before spraying it gold.
Obviously some bits look a bit weird at the moment because it’s got quite a few different surface texures and colours:


3rd June ’08
C-3PO is now mostly finished. The head isn’t quite a nice as I’d have liked, bu that was the best I could get out of wood filler and papier mache:


I have now made a new and better head for C-3PO which you can read about on the Roto-Moulding page.
Related Posts


About The Author
James Bruton
My name is James Bruton, I live in Southampton, UK. Please note that this is my personal project website, I have no products for sale, most of the information is provided so that you can have a go yourself... Read More