R2-D2 body construction This page is about constructing the body for R2-D2. You can the rest of the assembly process in themain project index. I bought a half
Misc Star Wars extra props This project is about various quick Star Wars props, check out my other Star Wars props In addition to R2-D2, C-3PO and Jabba
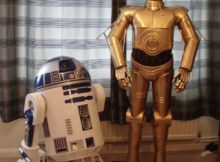
As a natural progression, after building R2-D2, I have decided to build a replica of C-3PO. This will be life size and completely built from scratch, so I’ll
R2-D2 legs construction This page is about constructing the legs for R2-D2. You can the rest of the assembly process in themain project index. The majority of the
R2-D2 dome construction This page is about constructing the dome for R2-D2. You can the rest of the assembly process in the main project index. My original plan